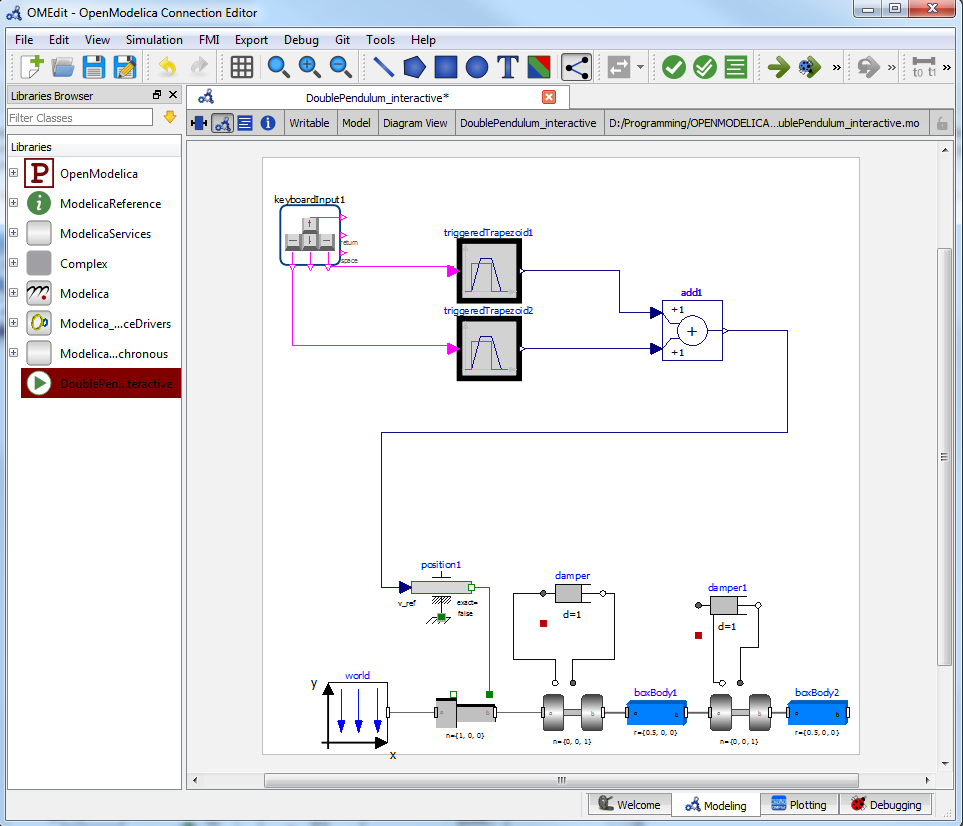
OMEdit - OpenModelica Connection Editor
OMEdit - OpenModelica Connection Editor is the new Graphical User Interface for graphical model editing in OpenModelica. It is implemented in C++ using the Qt graphical user interface library and supports the Modelica Standard Library that is included in the latest OpenModelica installation. This chapter gives a brief introduction to OMEdit and also demonstrates how to create a DCMotor model using the editor.
OMEdit provides several user friendly features for creating, browsing, editing, and simulating models:
Modeling - Easy model creation for Modelica models.
Pre-defined models - Browsing the Modelica Standard library to access the provided models.
User defined models - Users can create their own models for immediate usage and later reuse.
Component interfaces - Smart connection editing for drawing and editing connections between model interfaces.
Simulation - Subsystem for running simulations and specifying simulation parameters start and stop time, etc.
Plotting - Interface to plot variables from simulated models.
Starting OMEdit
A splash screen similar to the one shown in Figure 5 will appear indicating that it is starting OMEdit. The executable is found in different places depending on the platform (see below).
Figure 5 OMEdit Splash Screen.
Microsoft Windows
OMEdit can be launched using the executable placed in OpenModelicaInstallationDirectory/bin/OMEdit/OMEdit.exe. Alternately, choose OpenModelica > OpenModelica Connection Editor from the start menu in Windows.
Linux
Start OMEdit by either selecting the corresponding menu application item or typing “OMEdit” at the shell or command prompt.
Mac OS X
The default installation is /Application/MacPorts/OMEdit.app.
MainWindow & Browsers
The MainWindow contains several dockable browsers,
Libraries Browser
Documentation Browser
Variables Browser
Messages Browser
Figure 6 shows the MainWindow and browsers.
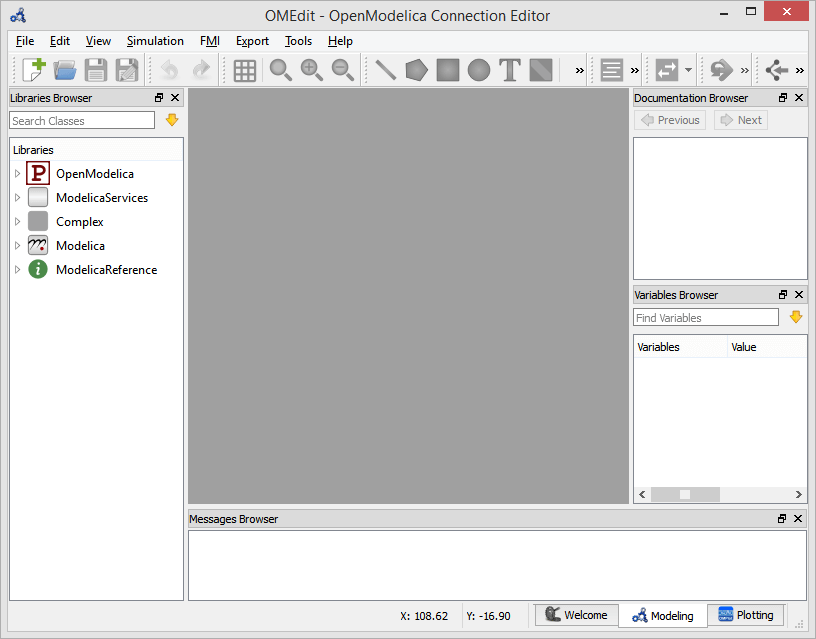
Figure 6 OMEdit MainWindow and Browsers.
The default location of the browsers are shown in Figure 6. All browsers except for Message Browser can be docked into left or right column. The Messages Browser can be docked into top or bottom areas. If you want OMEdit to remember the new docked position of the browsers then you must enable Preserve User's GUI Customizations option, see section General Options.
Filter Classes
To filter a class click Edit > Filter Classes or press keyboard shortcut Ctrl+Shift+F. The loaded Modelica classes can be filtered by typing any part of the class name.
Libraries Browser
To view the Libraries Browser click View > Windows > Libraries Browser. Shows the list of loaded Modelica classes. Each item of the Libraries Browser has right click menu for easy manipulation and usage of the class. The classes are shown in a tree structure with name and icon. The protected classes are not shown by default. If you want to see the protected classes then you must enable the Show Protected Classes option, see section General Options.
Documentation Browser
Displays the HTML documentation of Modelica classes. It contains the navigation buttons for moving forward and backward. It also contains a WYSIWYG editor which allows writing class documentation in HTML format. To view the Documentation Browser click View > Windows > Documentation Browser.
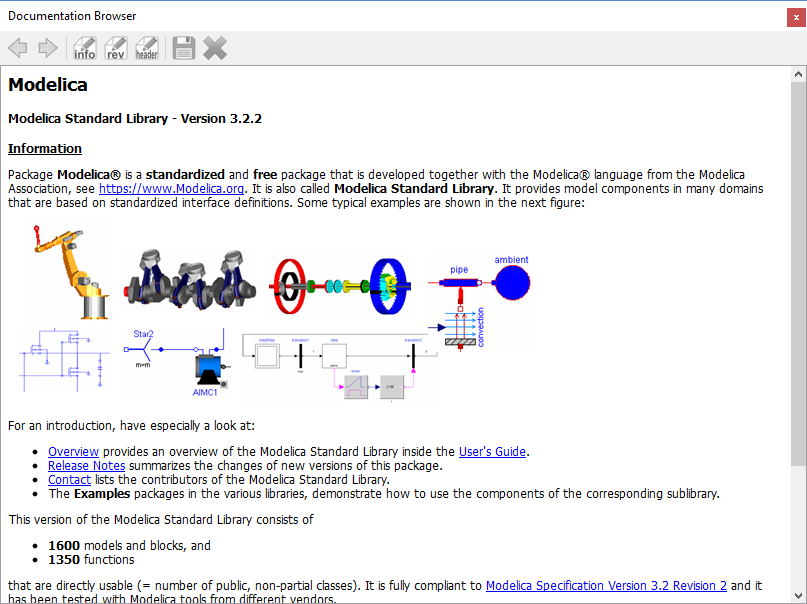
Figure 7 Documentation Browser.
Variables Browser
The class variables are structured in the form of the tree and are displayed in the Variables Browser. Each variable has a checkbox. Ticking the checkbox will plot the variable values. The complete Variables Browser can be collapsed and expanded using the Collapse All and Expand All buttons.
There is a find box for filtering the variable in the tree. By clicking the yellow down arrow you can set all the filtering options. The filtering can be done using Regular Expression, Wildcard and Fixed String; in all three cases, all variables whose full name contains a string corresponding to the filter string will be displayed.
Fixed String: shows all variables whose name contains the string verbatim
abcshowsabc,abc.def,xyz.abc,der(abc)etc.a.bshowsa.b,a.bcd,a.b.c,x.a.b,x.a.b.c, etc.
Wildcard: same as Fixed String; additionally, asterisks match any number of characters
der(*)shows all derivatives, e.g.der(x),der(abc),abc.der(xyz), etc.a*cshowsac,abc,abdc,xyz.adefc, etc.
Regular expression: shows all variables whose name contain a string that matches the regexp;
if the regexp ends with $, then the name must end with a string matching the regexp
abcshowsabc,abc.def,xyz.abc,der(abc)etc.abc$showsabc,xyz.abconlya.cshowsabc,abc.def,azc,xyz.adcetc. (.matches any character)a.*cshowsabc,abc.def,axyc,xyz.axxxxdcetc. (.*matches any number of character)body\.a_0\[1\]shows variables containingbody.a_0[1]. Note that.,[, and]are special regexp characters, so they must be escapedder\(.*\)shows all derivatives in the model. Note that(and)must be escapedx\[[2-4]\]shows elements 2, 3, and 4 of arraysx[:],abc.x[:],x[:].abcx\[.*\]shows all elements of arraysx[:],abc.x[:],x[:].abcabc|defshows all variables with names containing eitherabcordef
The browser allows manipulation of changeable parameters for Plot Window. It also displays the unit and description of the variable.
The browser also contains the slider and animation buttons. These controls are used for variable graphics and schematic animation of models i.e., DynamicSelect annotation. They are also used for debugging of state machines. Open the Diagram Window for animation. It is only possible to animate one model at a time.
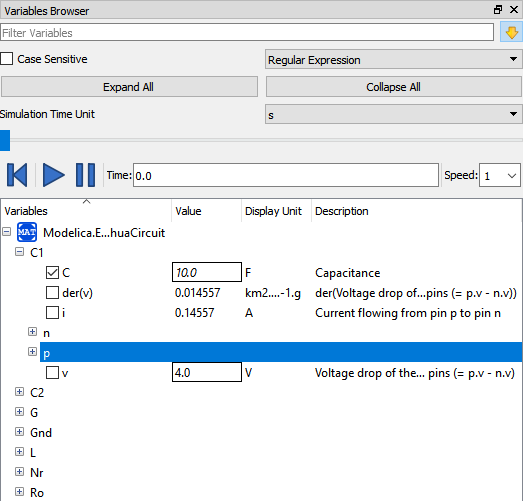
Figure 8 Variables Browser.
Messages Browser
Shows the list of errors. Following kinds of error can occur,
Syntax
Grammar
Translation
Symbolic
Simulation
Scripting
See section Messages Options for Messages Browser options.
Perspectives
The perspective tabs are located at the bottom right of the Main Window:
Welcome Perspective
Modeling Perspective
Plotting Perspective
Debugging Perspective
Welcome Perspective
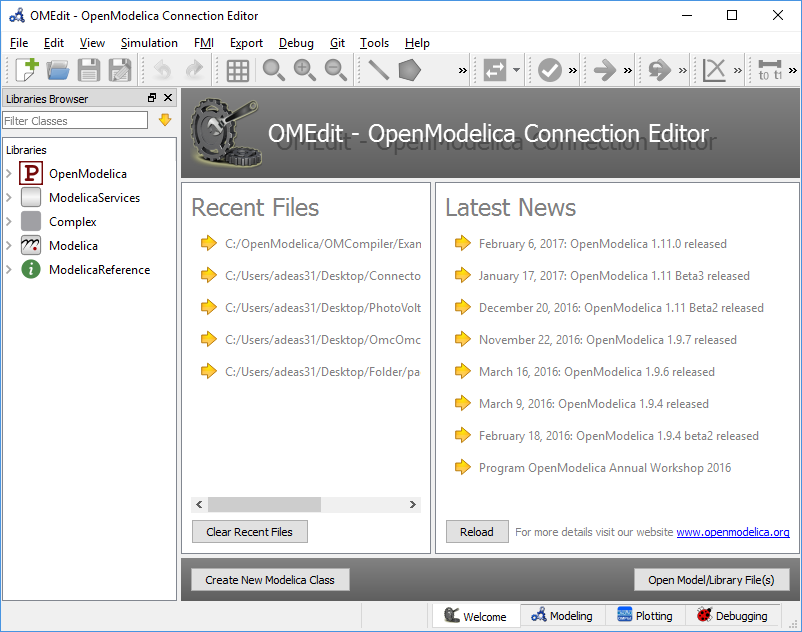
Figure 9 OMEdit Welcome Perspective.
The Welcome Perspective shows the list of recent files and the list of latest news from https://www.openmodelica.org. See Figure 9. The orientation of recent files and latest news can be horizontal or vertical. User is allowed to show/hide the latest news. See section General Options.
Modeling Perspective
The Modeling Perspective provides the interface where user can create and design their models. See Figure 10.
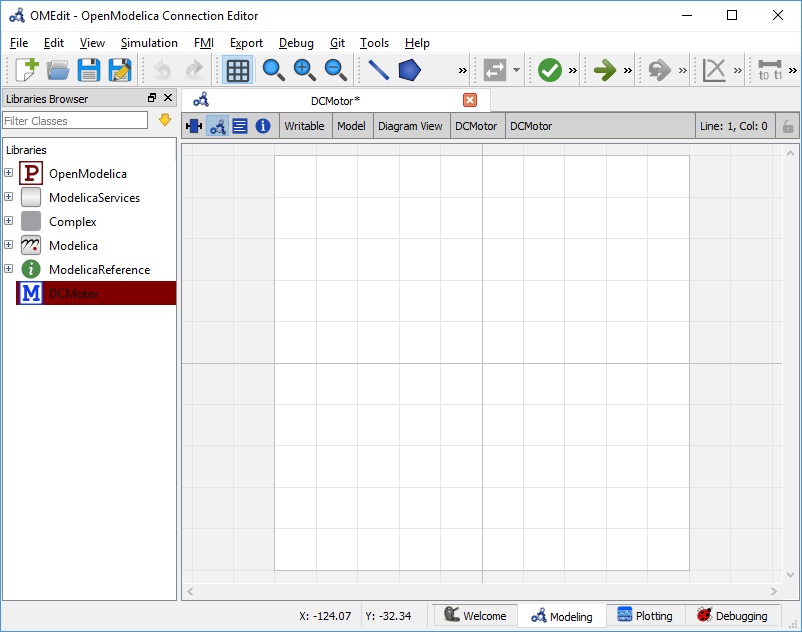
Figure 10 OMEdit Modeling Perspective.
The Modeling Perspective interface can be viewed in two different modes, the tabbed view and sub-window view, see section General Options.
Plotting Perspective
The Plotting Perspective shows the simulation results of the models. Plotting Perspective will automatically become active when the simulation of the model is finished successfully. It will also become active when user opens any of the OpenModelica's supported result file. Similar to Modeling Perspective this perspective can also be viewed in two different modes, the tabbed view and sub-window view, see section General Options.
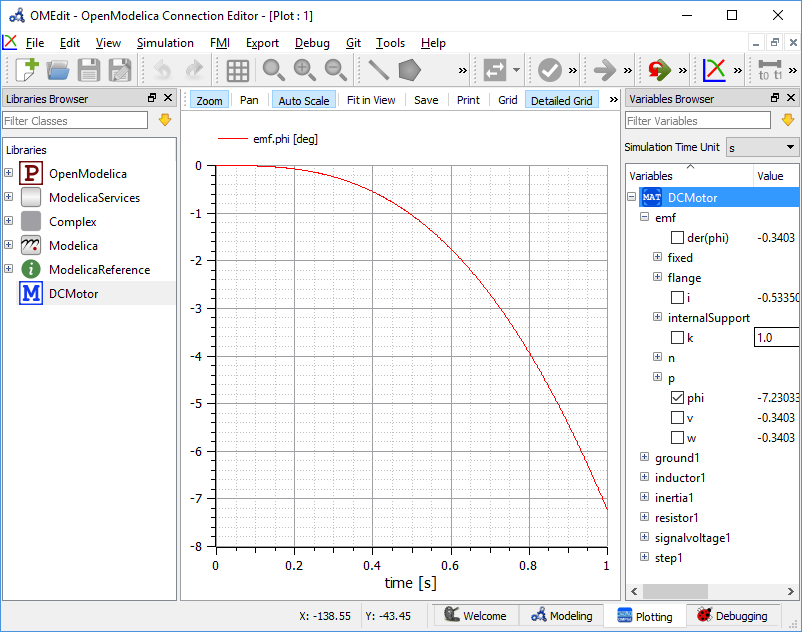
Figure 11 OMEdit Plotting Perspective.
Debugging Perspective
The application automatically switches to Debugging Perspective when user simulates the class with algorithmic debugger. The perspective shows the list of stack frames, breakpoints and variables.
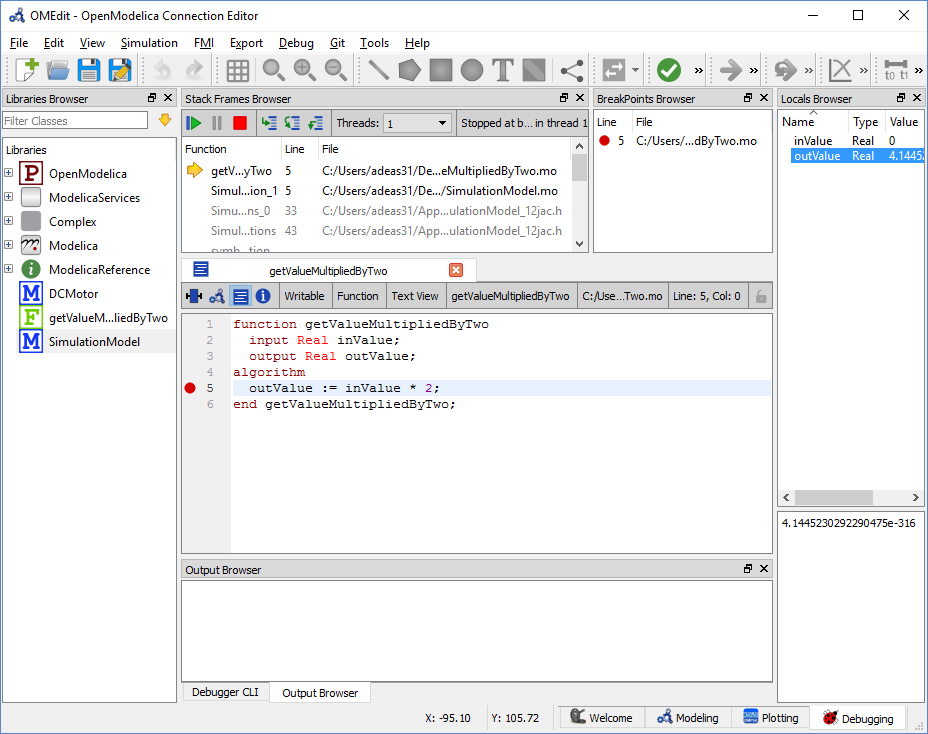
Figure 12 OMEdit Debugging Perspective.
Data Reconciliation
Calculate Data Reconciliation - Opens the dialog to run the data reconciliation algorithm.
Modeling a Model
Creating a New Modelica Class
Creating a new Modelica class in OMEdit is rather straightforward. Choose any of the following methods,
Select File > New > New Modelica Class from the menu.
Click on New Modelica Class toolbar button.
Click on the Create New Modelica Class button available at the left bottom of Welcome Perspective.
Press Ctrl+N.
Opening a Modelica File
Choose any of the following methods to open a Modelica file,
Select File > Open Model/Library File(s) from the menu.
Click on Open Model/Library File(s) toolbar button.
Click on the Open Model/Library File(s) button available at the right bottom of Welcome Perspective.
Press Ctrl+O.
(Note, for editing Modelica system files like MSL (not recommended), see Editing Modelica Standard Library)
Opening a Modelica File with Encoding
Select File > Open/Convert Modelica File(s) With Encoding from the menu. It is also possible to convert files to UTF-8.
Model Widget
For each Modelica class one Model Widget is created. It has a statusbar and a view area. The statusbar contains buttons for navigation between the views and labels for information. The view area is used to display the icon, diagram and text layers of Modelica class. See Figure 13.
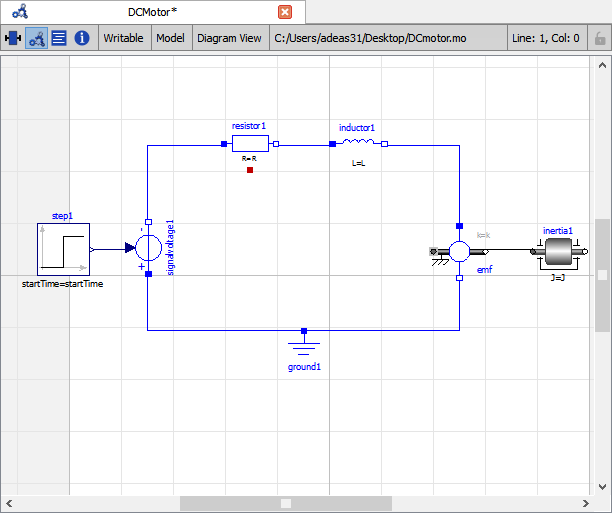
Figure 13 Model Widget showing the Diagram View.
Adding Component Models
Drag the models from the Libraries Browser and drop them on either Diagram or Icon View of Model Widget.
Making Connections
In order to connect one component model to another the user first needs
to enable the connect mode () from the toolbar.
Move the mouse over the connector. The mouse cursor will change from arrow cursor to cross cursor. To start the connection press left button and move while keeping the button pressed. Now release the left button. Move towards the end connector and click when cursor changes to cross cursor.
Simulating a Model
The simulation process in OMEdit is split into three main phases:
The Modelica model is translated into C/C++ code. The model is first instantiated by the frontend, which turns it into a flat set of variables, parameters, equations, algorithms, and functions. The backend then analyzes the mathematical structure of the flat model, applies symbolic simplifications and determines how the equations can be solved efficiently. Finally, based on this information, model-specific C/C++ code is generated. This part of the process can be influenced by setting Translation Flags (a.k.a. Command Line Options), e.g. deciding which kind of structural simplifications should be performed during the translation phase.
The C/C++ code is compiled and linked into an executable simulation code. Additional C/C++ compiler flags can be given to influence this part of the process, e.g. by setting compiler optimizations such as
-O3. Since multiple C/C++ source code files are generated for a given model, they are compiled in parallel by OMEdit, exploiting the power of multi-core CPUs.The simulation executable is started and produces the simulation results in a .mat or .csv file. The runtime behavior can be influenced by Simulation Flags, e.g. by choosing specific solvers, or changing the output file name. Note that it it possible to re-simulate a model multiple times, changing parameter values from the Variables Browser and/or changing some Simulation Flags. In this case, only Phase 3. is repeated, skipping Phases 1. and 2., which enables much faster iterations.
The simulation options for each model are stored inside the OMEdit data structure. They are set according to the following sequence,
Each model has its own translation and simulation options.
If the model is opened for the first time then the translation and simulation options are set to defaults, that can be customized in Tools | Options | Simulation.
experiment,__OpenModelica_commandLineOptionsand__OpenModelica_simulationFlagsannotations are applied if the model contains them.After that all the changes done via Simulation Setup window for a certain model are preserved for the whole session. If you want to use the same settings in future sessions then you should store them inside
experiment,__OpenModelica_commandLineOptions, and__OpenModelica_simulationFlagsannotations.
The OMEdit Simulation Setup can be launched by,
Selecting Simulation > Simulation Setup from the menu. (requires a model to be active in ModelWidget)
Clicking on the Simulation Setup toolbar button. (requires a model to be active in ModelWidget)
Right clicking the model from the Libraries Browser and choosing Simulation Setup.
General
Simulation Interval
Start Time - the simulation start time.
Stop Time - the simulation stop time.
Number of Intervals - the simulation number of intervals.
Interval - the length of one interval (i.e., stepsize)
Integration
Method - the simulation solver. See section Integration Methods for solver details.
Tolerance - the simulation tolerance.
Jacobian - the jacobian method to use.
DASSL/IDA Options
Root Finding - Activates the internal root finding procedure of dassl.
Restart After Event - Activates the restart of dassl after an event is performed.
Initial Step Size
Maximum Step Size
Maximum Integration Order
C/C++ Compiler Flags (Optional) - the optional C/C++ compiler flags.
Number of Processors - the number of processors used to build the simulation.
Build Only - only builds the class.
Launch Transformational Debugger - launches the transformational debugger.
Launch Algorithmic Debugger - launches the algorithmic debugger.
Launch Animation - launches the 3d animation window.
Interactive Simulation
Simulate with steps (makes the interactive simulation synchronous; plots nicer curves at the expense of performance)
Simulation server port
Translation Flags
Simulation Flags
Model Setup File (Optional) - specifies a new setup XML file to the generated simulation code.
Initialization Method (Optional) - specifies the initialization method.
Equation System Initialization File (Optional) - specifies an external file for the initialization of the model.
Equation System Initialization Time (Optional) - specifies a time for the initialization of the model.
Clock (Optional) - the type of clock to use.
Linear Solver (Optional) - specifies the linear solver method.
Non Linear Solver (Optional) - specifies the nonlinear solver.
Linearization Time (Optional) - specifies a time where the linearization of the model should be performed.
Output Variables (Optional) - outputs the variables a, b and c at the end of the simulation to the standard output.
Profiling - creates a profiling HTML file.
CPU Time - dumps the cpu-time into the result file.
Enable All Warnings - outputs all warnings.
Logging (Optional)
LOG_STDOUT - standard output stream. This stream is always active, can be disabled with -lv=-LOG_STDOUT
LOG_ASSERT - This stream is always active, can be disabled with -lv=-LOG_ASSERT
LOG_DASSL - additional information about dassl solver.
LOG_DASSL_STATES - outputs the states at every dassl call.
LOG_DEBUG - additional debug information.
LOG_DELAY - Debug information for delay operator.
LOG_DIVISION - Log division by zero.
LOG_DSS - outputs information about dynamic state selection.
LOG_DSS_JAC - outputs jacobian of the dynamic state selection.
LOG_DT - additional information about dynamic tearing.
LOG_DT_CONS - additional information about dynamic tearing (local and global constraints).
LOG_EVENTS - additional information during event iteration.
LOG_EVENTS_V - verbose logging of event system.
LOG_GBODE - Information about GBODE solver.
LOG_GBODE_V - Verbose information about GBODE solver.
LOG_GBODE_NLS - Log non-linear solver process of GBODE solver.
LOG_GBODE_NLS_V - Verbose log non-linear solver process of GBODE solver.
LOG_GBODE_STATES - Output states at every GBODE call.
LOG_INIT - additional information during initialization.
LOG_INIT_HOMOTOPY - Log homotopy initialization.
LOG_INIT_V - Verbose information during initialization.
LOG_IPOPT - information from Ipopt.
LOG_IPOPT_FULL - more information from Ipopt.
LOG_IPOPT_JAC - check jacobian matrix with Ipopt.
LOG_IPOPT_HESSE - check hessian matrix with Ipopt.
LOG_IPOPT_ERROR - print max error in the optimization.
LOG_JAC - Outputs the jacobian matrix used by ODE solvers.
LOG_LS - logging for linear systems.
LOG_LS_V - verbose logging of linear systems.
LOG_NLS - logging for nonlinear systems.
LOG_NLS_V - verbose logging of nonlinear systems.
LOG_NLS_HOMOTOPY - logging of homotopy solver for nonlinear systems.
LOG_NLS_JAC - outputs the jacobian of nonlinear systems.
LOG_NLS_JAC_TEST - tests the analytical jacobian of nonlinear systems.
LOG_NLS_NEWTON_DIAGNOSTICS - Log Newton diagnostics. A Diagnostic method to figure out which individual initial guess values are more likely to be causing the convergence failure of Newton-type iterative nonlinear solvers.
LOG_NLS_RES - outputs every evaluation of the residual function.
LOG_NLS_EXTRAPOLATE - outputs debug information about extrapolate process.
LOG_RES_INIT - outputs residuals of the initialization.
LOG_RT - additional information regarding real-time processes.
LOG_SIMULATION - additional information about simulation process.
LOG_SOLVER - additional information about solver process.
LOG_SOLVER_V - verbose information about the integration process.
LOG_SOLVER_CONTEXT - context information during the solver process.
LOG_SOTI - final solution of the initialization.
LOG_SPATIALDISTR - logging of internal operations for spatialDistribution.
LOG_STATS - additional statistics about timer/events/solver.
LOG_STATS_V - additional statistics for LOG_STATS.
LOG_SUCCESS - This stream is always active, can be disabled with -lv=-LOG_SUCCESS.
LOG_SYNCHRONOUS - Log clocks and sub-clocks for synchronous features.
LOG_ZEROCROSSINGS - additional information about the zero-crossings.
Additional Simulation Flags (Optional) - specify any other simulation flag.
Output
Output Format - the simulation result file output format.
Single Precision - Output results in single precision (only for mat output format).
File Name Prefix (Optional) - the name is used as a prefix for the output files.
Result File (Optional) - the simulation result file name.
Variable Filter (Optional) - only output variables with names fully matching the regular expression.
Protected Variables if not encrypted - adds the protected variables in result file.
Equidistant Time Grid - output the internal steps given by dassl instead of interpolating results into an equidistant time grid as given by stepSize or numberOfIntervals.
Store Variables at Events - adds the variables at time events.
Show Generated File - displays the generated files in a dialog box.
The Variable Filter takes a regular expression input and only saves in the simulation results file those variables whose names fully match it. Here are some simple examples:
.*matches any variable (default choice)xy.*matches variables starting withxy.*yzmatches variables ending withyzabc\.def.*matches variables starting withabc.def. Note that the.character is a regex meta-character, so it must be escaped by a\.*body\.a_0\[1\]matches variables ending withbody.a_0[1]. Note that.,[, and]must be escapedx\[.*\]matches all elements of arrayxx\[[2-4]\]matches elements 2, 3, and 4 of arrayxabc.*|def.*matches variables starting withabcordef.*der\(.*\)matches all derivatives in the model. Note that(and)must be escaped
Please note that all the model variables will still be shown in the Variables Browser tree; however, only those for which results were actually saved will have a checkbox to plot them.
CSV-File Data Input
When simulating Modelica models with top-level inputs (input variables or input
connectors), these inputs are assumed to be equal to their start value by default.
However, it is possible to feed them with input signals obtained from CSV (Comma-Separated
Value) input data files, by means of the -csvInput simulation
flag, that can be set in the Additional Simulation Flags (Optional) field of the
Simulation Flags tab. For example, setting -csvInput=myinput.csv causes the runtime
executable to read such input data from the myinput.csv file.
CSV files should contain the names of the input variables in the first row, beginning with
time on the first column, and the values of such variables for each point in time in
subsequent rows, with non-decreasing time values. The variable names should be enclosed by
quotation marks in case they contain spaces, to avoid ambiguities. The default separator
for data items within each row is the comma, but it is also possible to use other
separators, e.g., space, tab, or semi-colon; in this case, the file should start with the
separator specification "sep=x" (including the quotation marks), where x is the
separator character.
For example, assume your model has three top-level inputs named u1, u2, and
u3. These are valid CSV input files:
time, u3, u2, u1
0.0, 0.0, 0.0, 0.0
1.0, 0.0, 0.0, 0.0
2.0, 0.0, 0.0, 1.0

"sep=;" time; u3; u2; u1
0.0; 0.0; 0.0; 0.0
1.0; 0.0; 0.0; 0.0
2.0; 0.0; 0.0; 1.0

"sep= " "time" "u3" "u2" "u1"
0.0 0.0 0.0 0.0
1.0 0.0 0.0 0.0
2.0 0.0 0.0 1.0
Note that input labels need not be lexicographically ordered, the association between the columns and the inputs is given by the first row.
The CSV-file provides the values of the top level inputs at the specified points in time; linear interpolation is used to provide intermediate values between any two subsequent data points. Discontinuous inputs can be obtained by providing two consecutive rows with the same time value, containing the left limit values and the right limit values.
Unless an absolute pathname is provided for the CSV-files, OMEdit will load it from the sub-directory of the working directory which has the same name of the model, where all the other input and output data files are located.
Data Reconciliation
Algorithm - data reconciliation algorithm.
Measurement Input File - measurement input file.
Correlation Matrix Input File - correlation matrix file.
Epsilon
2D Plotting
Successful simulation of model produces the result file which contains the instance variables that are candidate for plotting. Variables Browser will show the list of such instance variables. Each variable has a checkbox, checking it will plot the variable. See Figure 11. To get several plot windows tiled horizontally or vertically use the menu items Tile Windows Horizontally or Tile Windows Vertically under View Menu.
Types of Plotting
The plotting type depends on the active Plot Window. By default the plotting type is Time Plot.
Time Plot
Plots the variable over the simulation time. You can have multiple Time
Plot windows by clicking on New Plot Window toolbar button ().
Plot Parametric
Draws a two-dimensional parametric diagram, between variables x and y,
with y as a function of x. You can have multiple Plot Parametric
windows by clicking on the New Plot Parametric toolbar button ().
Select the x-axis variable while holding down the shift key, release the shift key and then select y-axis variables. One or many y-axis variables can be selected against one x-axis variable. To select a new x-axis variable press and hold the shift key again.
Unchecking the x-axis variable will uncheck all y-axis variables linked to it.
Array Plot
Plots an array variable so that the array elements' indexes are on the x-axis and corresponding
elements' values are on the y-axis. The time is controlled by the slider above the variable tree.
Right click the result file in variable browser and select Enable Time Controls to enable the slider.
When an array is present in the model, it has a principal array node in the variable tree.
To plot this array as an Array Plot, match the principal node. The principal node may be expanded
into particular array elements. To plot a single element in the Time Plot, match the element.
A new Array Plot window is opened using the New Array Plot Window toolbar button ().
Array Parametric Plot
Plots the first array elements' values on the x-axis versus the second array elements'
values on the y-axis. The time is controlled by the slider above the variable tree.
Right click the result file in variable browser and select Enable Time Controls to enable the slider.
To create a new Array Parametric Plot, press the New Array Parametric Plot Window toolbar
button (), then match the principle array node in the
variable tree view to be plotted on the x-axis and match the principle array node to be
plotted on the y-axis.
Diagram Window
Shows the active ModelWidget as a read only diagram. You can only have one
Diagram Window. To show it click on Diagram Window toolbar button ( ).
).
Plot Window
A plot window shows the plot curve of instance variables. Several plot curves can be plotted in the same plot window. See Figure 11.
Re-simulating a Model
The Variables Browser allows manipulation of changeable
parameters for re-simulation.
After changing the parameter values user can click on the re-simulate
toolbar button (), or right click the model in Variables Browser and choose
re-simulate from the menu.
3D Visualization
Since OpenModelica 1.11 , OMEdit has built-in 3D visualization, which replaces third-party libraries (such as Modelica3D) for 3D visualization.
Running a Visualization
The 3d visualization is based on OpenSceneGraph. In order to run the visualization simply right click the class in Libraries Browser an choose “Simulate with Animation” as shown in Figure 14.
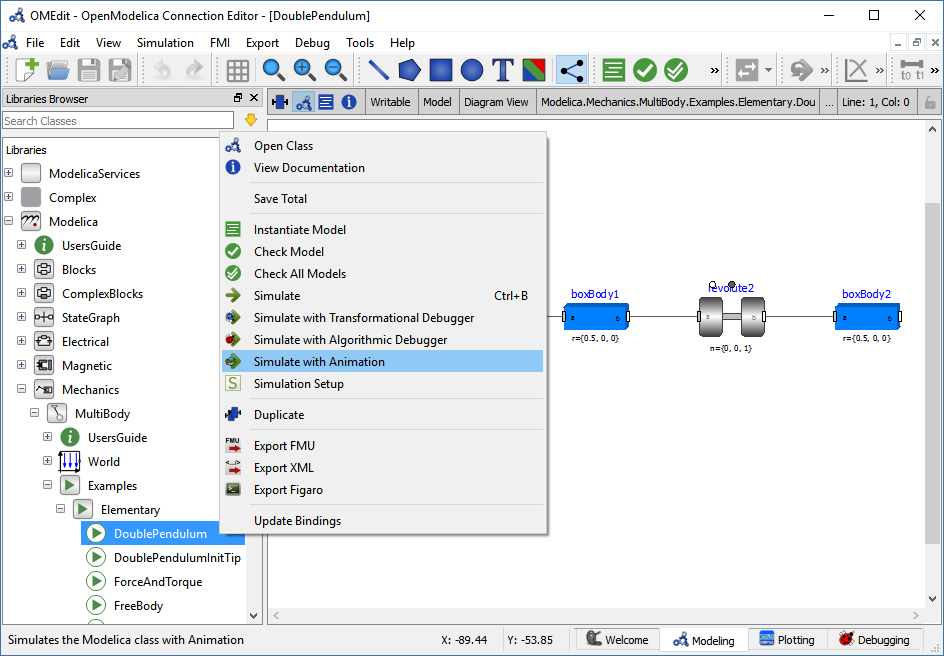
Figure 14 OMEdit Simulate with Animation.
One can also run the visualization via Simulation > Simulate with Animation from the menu.
When simulating a model in animation mode, the flag +d=visxml is set. Hence, the compiler will generate a scene description file _visual.xml which stores all information on the multibody shapes. This scene description references all variables which are needed for the animation of the multibody system. When simulating with +d=visxml, the compiler will always generate results for these variables.
Viewing a Visualization
After the successful simulation of the model, the visualization window will show up automatically as shown in Figure 15.
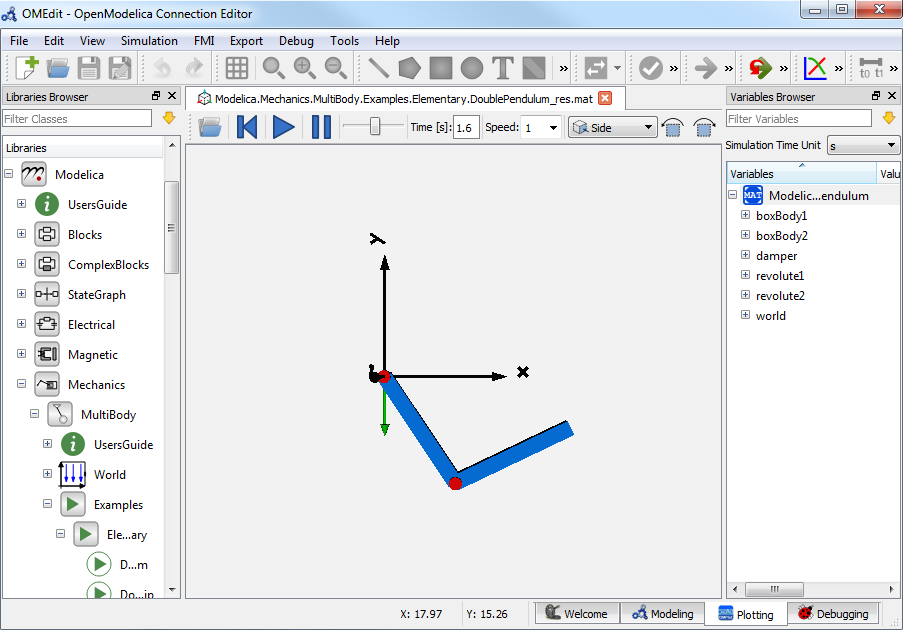
Figure 15 OMEdit 3D Visualization.
The animation starts with pushing the play button. The animation is played until stopTime or until the pause button is pushed. By pushing the previous button, the animation jumps to the initial point of time. Points of time can be selected by moving the time slider or by inserting a simulation time in the Time-box. The speed factor of animation in relation to realtime can be set in the Speed-dialog. Other animations can be opened by using the open file button and selecting a result file with a corresponding scene description file.
The 3D camera view can be manipulated as follows:
Operation |
Key |
Mouse Action |
|---|---|---|
Move Closer/Further |
none |
Wheel |
Move Closer/Further |
Right Mouse Hold |
Up/Down |
Move Up/Down/Left/Right |
Middle Mouse Hold |
Move Mouse |
Move Up/Down/Left/Right |
Left and Right Mouse Hold |
Move Mouse |
Rotate |
Left Mouse Hold |
Move Mouse |
Shape context menu |
Right Mouse + Shift |
Predefined views (Isometric, Side, Front, Top) can be selected and the scene can be tilted by 90° either clock or anticlockwise with the rotation buttons.
Additional Visualization Features
The shapes that are displayed in the viewer can be selected with shift + right click. If a shape is selected, a context menu pops up that offers additional visualization features
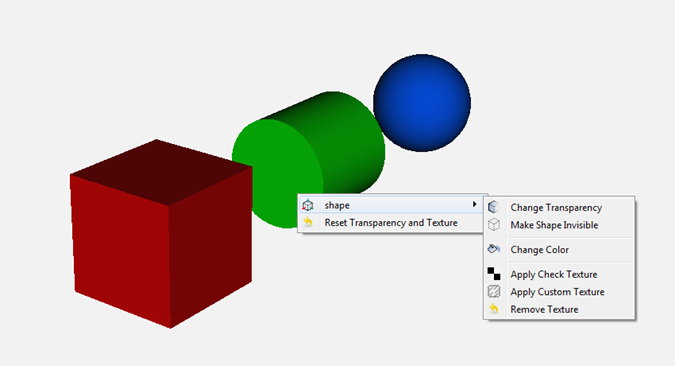
The following features can be selected:
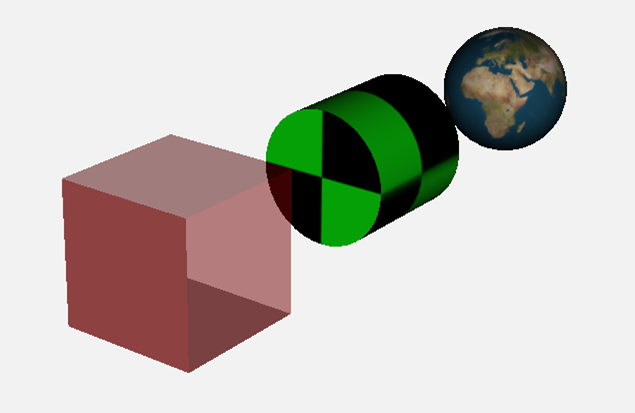
Menu |
Description |
|---|---|
Change Transparency |
The shape becomes either transparent or intransparent. |
Make Shape Invisible |
The shape becomes invisible. |
Change Color |
A color dialog pops up and the color of the shape can be set. |
Apply Check Texture |
A checked texture is applied to the shape. |
Apply Custom Texture |
A file selection dialog pops up and an image file can be selected as a texture. |
Remove Texture |
Removes the current texture of the shape. |
Animation of Realtime FMUs
Instead of a result file, OMEdit can load Functional Mock-up Units to retrieve the data for the animation of multibody systems. Just like opening a mat-file from the animation-plotting view, one can open an FMU-file. Necessarily, the FMU has to be generated with the +d=visxml flag activated, so that a scene description file is generated in the same directory as the FMU. Currently, only FMU 1.0 and FMU 2.0 model exchange are supported. When choosing an FMU, the simulation settings window pops up to choose solver and step size. Afterwards, the model initializes and can be simulated by pressing the play button.
Interactive Realtime Animation of FMUs
FMUs can be simulated with realtime user interaction. A possible solution is to equip the model with an interaction model from the Modelica_DeviceDrivers library (https://github.com/modelica/Modelica_DeviceDrivers). The realtime synchronization is done by OMEdit so no additional time synchronization model is necessary.
Interactive Simulation
Warning
Interactive simulation is an experimental feature.
Interactive simulation is enabled by selecting interactive simulation in the simulation setup.
There are two main modes of execution: asynchronous and synchronous (simulate with steps). The difference is that in synchronous (step mode), OMEdit sends a command to the simulation for each step that the simulation should take. The asynchronous mode simply tells the simulation to run and samples variables values in real-time; if the simulation runs very fast, fewer values will be sampled.
When running in asynchronous mode, it is possible to simulate the model in real-time (with a scaling factor just like simulation flag -rt, but with the ability to change the scaling factor during the interactive simulation). In the synchronous mode, the speed of the simulation does not directly correspond to real-time.
How to Create User Defined Shapes - Icons
Users can create shapes of their own by using the shape creation tools available in OMEdit.
Line Tool - Draws a line. A line is created with a minimum of two points. In order to create a line, the user first selects the line tool from the toolbar and then click on the Icon/Diagram View; this will start creating a line. If a user clicks again on the Icon/Diagram View a new line point is created. In order to finish the line creation, user has to double click on the Icon/Diagram View.
Polygon Tool - Draws a polygon. A polygon is created in a similar fashion as a line is created. The only difference between a line and a polygon is that, if a polygon contains two points it will look like a line and if a polygon contains more than two points it will become a closed polygon shape.
Rectangle Tool - Draws a rectangle. The rectangle only contains two points where first point indicates the starting point and the second point indicates the ending the point. In order to create rectangle, the user has to select the rectangle tool from the toolbar and then click on the Icon/Diagram View, this click will become the first point of rectangle. In order to finish the rectangle creation, the user has to click again on the Icon/Diagram View where he/she wants to finish the rectangle. The second click will become the second point of rectangle.
Ellipse Tool - Draws an ellipse. The ellipse is created in a similar way as a rectangle is created.
Text Tool - Draws a text label.
Bitmap Tool - Draws a bitmap container.
The shape tools are located in the toolbar. See Figure 16.
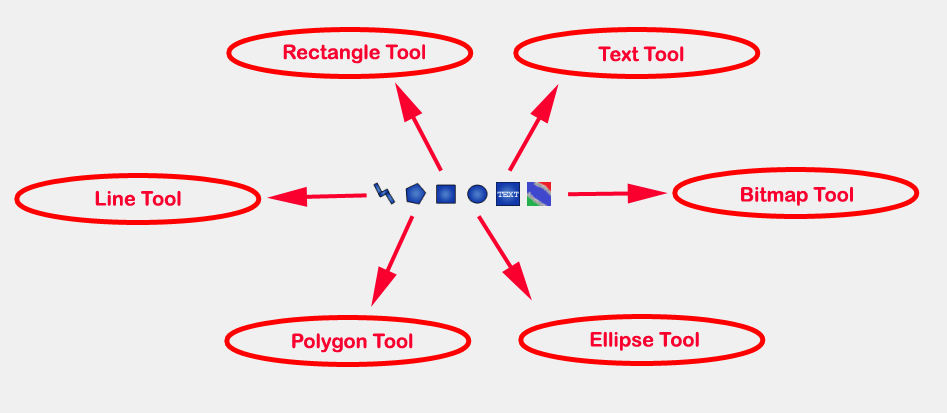
Figure 16 User defined shapes.
The user can select any of the shape tools and start drawing on the Icon/Diagram View. The shapes created on the Diagram View of Model Widget are part of the diagram and the shapes created on the Icon View will become the icon representation of the model.
For example, if a user creates a model with name testModel and add a rectangle using the rectangle tool and a polygon using the polygon tool, in the Icon View of the model. The model's Modelica Text will appear as follows:
model testModel
  annotation(Icon(graphics = {Rectangle(rotation = 0, lineColor = {0,0,255}, fillColor = {0,0,255}, pattern = LinePattern.Solid, fillPattern = FillPattern.None, lineThickness = 0.25, extent = {{ -64.5,88},{63, -22.5}}),Polygon(points = {{ -47.5, -29.5},{52.5, -29.5},{4.5, -86},{ -47.5, -29.5}}, rotation = 0, lineColor = {0,0,255}, fillColor = {0,0,255}, pattern = LinePattern.Solid, fillPattern = FillPattern.None, lineThickness = 0.25)}));
end testModel;
In the above code snippet of testModel, the rectangle and a polygon are added to the icon annotation of the model. Similarly, any user defined shape drawn on a Diagram View of the model will be added to the diagram annotation of the model.
Global head section in documentation
If you want to use same styles or same JavaScript for the classes contained inside a
package then you can define __OpenModelica_infoHeader annotation inside the
Documentation annotation of a package.
For example,
package P
  model M
    annotation(Documentation(info="<html>
      <a href=\"javascript:HelloWorld()\">Click here</a>
    </html>"));
  end M;
 annotation(Documentation(__OpenModelica_infoHeader="
     <script type=\"text/javascript\">
       function HelloWorld() {
         alert(\"Hello World!\");
       }
     </script>"));
end P;
In the above example model M does not need to define the javascript function
HelloWorld.
It is only defined once at the package level using the __OpenModelica_infoHeader and
then all classes contained in the package can use it.
In addition styles and JavaScript can be added from file locations using Modelica URIs. Example:
package P
  model M
    annotation(Documentation(info="<html>
      <a href=\"javascript:HelloWorld()\">Click here</a>
    </html>"));
  end M;
 annotation(Documentation(__OpenModelica_infoHeader="
     <script type=\"text/javascript\">
        src=\"modelica://P/Resources/hello.js\">
       }
     </script>"));
end P;
Where the file Resources/hello.js then contains:
function HelloWorld() {
  alert("Hello World!");
}
Options
OMEdit allows users to save several options which will be remembered across different sessions of OMEdit. The Options Dialog can be used for reading and writing the options.
General Options
General
Language - Sets the application language.
Working Directory - Sets the application working directory. All files are generated in this directory.
Toolbar Icon Size - Sets the size for toolbar icons.
Preserve User's GUI Customizations - If true then OMEdit will remember its windows and toolbars positions and sizes.
Terminal Command - Sets the terminal command. When user clicks on Tools > Open Terminal then this command is executed.
Terminal Command Arguments - Sets the terminal command arguments.
Hide Variables Browser - Hides the variable browser when switching away from plotting perspective.
Activate Access Annotations - Activates the access annotations for the non-encrypted libraries. Access annotations are always active for encrypted libraries.
Create a model.bak-mo backup file when deleting a model
Display errors/warnings when instantiating the graphical annotations - if true then the errors/warnings are shown when using OMC API for graphical annotations.
Enable CRML Support - Enables the CRML support. The user can create/open .crml files and translate them to Modelica.
Libraries Browser
Library Icon Size - Sets the size for library icons.
Max. Library Icon Text Length to Show - Sets the maximum text length that can be shown in the icon in Libraries Browser.
Show Protected Classes - If enabled then Libraries Browser will also list the protected classes.
Show Hidden Classes if not encrypted - If enabled then Libraries Browser will also list the hidden classes. Ignores the annotation(Protection(access = Access.hide))
Synchronize with Model Widget - If enabled then Libraries Browser will scroll automatically to the active Model Widget i.e., the current model.
Enable Auto Save - Enables/disables the auto save feature.
Auto Save interval - Sets the auto save interval value. The minimum possible interval value is 60 seconds.
Welcome Page
Horizontal View/Vertical View - Sets the view mode for welcome page.
Show Latest News - If enabled then the latest news from https://openmodelica.org are shown.
Recent Files and Latest News Size - Sets the display size for recent files and latest news items.
Optional Features
Disable new instance-based graphical editing of models - Enables/disables the use of instance-based graphical editing. The instance-based graphical editing enables features like parameter-dependent conditional connectors, conditional dialog enable, replaceable classes and models, etc. It also provides much faster rendering than the previously implemented graphical editing framework. This feature has been thoroughly tested, but it could still have some issues; in case the graphical rendering of models fails (blank screen) or is not correct, you can disable the instance-based editing and fall back to the old editing framework. In that case, please open a ticket on the OpenModelica issue tracker so we can fix the issue for the next release.
Libraries Options
General
MODELICAPATH - Sets the MODELICAPATH. MODELICAPATH is used to load libraries.
System libraries loaded automatically on startup - The list of system libraries that are loaded on startup.
Load latest Modelica version on startup - Is true then the latest available version of the Modelica Standard Library is always loaded along with its dependencies.
User libraries loaded automatically on startup - The list of user libraries/files that are loaded on startup.
Text Editor Options
Format
Line Ending - Sets the file line ending.
Byte Order Mark (BOM) - Sets the file BOM.
Tabs and Indentation
Tab Policy - Sets the tab policy to either spaces or tabs only.
Tab Size - Sets the tab size.
Indent Size - Sets the indent size.
Syntax Highlight and Text Wrapping
Enable Syntax Highlighting - Enable/Disable the syntax highlighting.
Enable Code Folding - Enable/Disable the code folding. When code folding is enabled multi-line annotations are collapsed into a compact icon (a rectangle containing "...)"). A marker containing a "+" sign becomes available at the left-side of the involved line, allowing the code to be expanded/re-collapsed at will.
Match Parentheses within Comments and Quotes - Enable/Disable the matching of parentheses within comments and quotes.
Enable Line Wrapping - Enable/Disable the line wrapping.
Autocomplete
Enable Autocomplete - Enables/Disables the autocomplete.
Font
Font Family - Shows the names list of available fonts. Sets the font for the editor.
Font Size - Sets the font size for the editor.
Modelica Editor Options
Preserve Text Indentation - If true then uses diffModelicaFileListings API call otherwise uses the OMC pretty-printing.
Colors
Items - List of categories used of syntax highlighting the code.
Item Color - Sets the color for the selected item.
Preview - Shows the demo of the syntax highlighting.
Modelica Script Editor Options
Colors
Items - List of categories used of syntax highlighting the code.
Item Color - Sets the color for the selected item.
Preview - Shows the demo of the syntax highlighting.
MetaModelica Editor Options
Colors
Items - List of categories used of syntax highlighting the code.
Item Color - Sets the color for the selected item.
Preview - Shows the demo of the syntax highlighting.
SSP Editor Options
Colors
Items - List of categories used of syntax highlighting the code.
Item Color - Sets the color for the selected item.
Preview - Shows the demo of the syntax highlighting.
CRML Editor Options
Colors
Items - List of categories used of syntax highlighting the code.
Item Color - Sets the color for the selected item.
Preview - Shows the demo of the syntax highlighting.
C/C++ Editor Options
Colors
Items - List of categories used of syntax highlighting the code.
Item Color - Sets the color for the selected item.
Preview - Shows the demo of the syntax highlighting.
HTML Editor Options
Colors
Items - List of categories used of syntax highlighting the code.
Item Color - Sets the color for the selected item.
Preview - Shows the demo of the syntax highlighting.
Graphical Views Options
General
Modeling View Mode
Tabbed View/SubWindow View - Sets the view mode for modeling.
Default View
Icon View/DiagramView/Modelica Text View/Documentation View - If no preferredView annotation is defined then this setting is used to show the respective view when user double clicks on the class in the Libraries Browser.
Move connectors together on both icon and diagram layers
Simulation Options
Simulation
Translation Flags
Matching Algorithm - sets the matching algorithm for simulation.
Index Reduction Method - sets the index reduction method for simulation.
Show additional information from the initialization process - prints the information from the initialization process
Evaluate all parameters (faster simulation, cannot change them at runtime) - makes the simulation more efficient but you have to recompile the model if you want to change the parameter instead of re-simulate.
Enable analytical jacobian for non-linear strong components - enables analytical jacobian for non-linear strong components without user-defined function calls.
Enable parallelization of independent systems of equations (Experimental)
Enable old frontend for code generation
Enable FMU Import - See FMI Import - SSP.
Additional Translation Flags - sets the translation flags see Options
Target Language - sets the target language in which the code is generated.
Target Build - sets the target build that is used to compile the generated code.
C Compiler - sets the C compiler for compiling the generated code.
CXX Compiler - sets the CXX compiler for compiling the generated code.
Use static linking - if true then static linking is used for simulation executable. The default is dynamic linking. This option is only available on Windows.
Post compilation command - if not empty allows to run a command after the compilation step. A possible use-case is to be able to sign the binaries before execution to comply with the security policy. The command is run in the same folder where the simulation executable is created. The interpreter executable must be passed to run shell scripts, eg on Windows: powershell.exe -File C:script.ps1
Ignore __OpenModelica_commandLineOptions annotation - if true then ignores the __OpenModelica_commandLineOptions annotation while running the simulation.
Ignore __OpenModelica_simulationFlags annotation - if true then ignores the __OpenModelica_simulationFlags annotation while running the simulation.
Save class before simulation - if true then always saves the class before running the simulation.
Switch to plotting perspective after simulation - if true then GUI always switches to plotting perspective after the simulation.
Close completed simulation output windows before simulation - if true then the completed simulation output windows are closed before starting a new simulation.
Delete intermediate compilation files - if true then the files generated during the compilation are deleted automatically.
Delete entire simulation directory of the model when OMEdit is closed - if true then the entire simulation directory is deleted on quit.
Output
Structured - Shows the simulation output in the form of tree structure.
Formatted Text - Shows the simulation output in the form of formatted text.
Display Limit - Sets the display limit for simulation output. A link to log file is shown once the limit is reached.
Messages Options
General
Output Size - Specifies the maximum number of rows the Message Browser may have. If there are more rows then the rows are removed from the beginning.
Reset messages number before simulation - Resets the messages counter before starting the simulation.
Clear messages browser before checking, instantiation & simulation - If enabled then the message browser is cleared before checking, instantiation & simulation of model.
Do not automatically enlarge message browser when a new message is available - If enabled then the message browser will not be enlarged instead the tabbar shown will start blinking indicating that a new message is available.
Font and Colors
Font Family - Sets the font for the messages.
Font Size - Sets the font size for the messages.
Notification Color - Sets the text color for notification messages.
Warning Color - Sets the text color for warning messages.
Error Color - Sets the text color for error messages.
Notifications Options
Notifications
Always quit without prompt - If true then OMEdit will quit without prompting the user.
Show item dropped on itself message - If true then a message will pop-up when a class is dragged and dropped on itself.
Show model is partial and component is added as replaceable message - If true then a message will pop-up when a partial class is added to another class.
Show component is declared as inner message - If true then a message will pop-up when an inner component is added to another class.
Show save model for bitmap insertion message - If true then a message will pop-up when user tries to insert a bitmap from a local directory to an unsaved class.
Always ask for the dragged component name - If true then a message will pop-up when user drag & drop the component on the graphical view.
Always ask for what to do with the text editor error - If true then a message will always pop-up when there is an error in the text editor.
If new frontend for code generation fails
Always ask for old frontend
Try with old frontend once
Switch to old frontend permanently
Keep using new frontend
Line Style Options
Line Style
Color - Sets the line color.
Pattern - Sets the line pattern.
Thickness - Sets the line thickness.
Start Arrow - Sets the line start arrow.
End Arrow - Sets the line end arrow.
Arrow Size - Sets the start and end arrow size.
Smooth - If true then the line is drawn as a Bezier curve.
Fill Style Options
Fill Style
Color - Sets the fill color.
Pattern - Sets the fill pattern.
Plotting Options
General
Auto Scale - Sets whether to auto scale the plots or not.
Prefix Units - Automatically pick the right prefix for units for the new plot windows. For existing plot windows use the Plot Window Menu.
Plotting View Mode
Tabbed View/SubWindow View - Sets the view mode for plotting.
Curve Style
Pattern - Sets the curve pattern.
Thickness - Sets the curve thickness.
Variable filter
Filter Interval - Delay in filtering the variables. Set the value to 0 if you don't want any delay.
Font Size - sets the font size for plot window items
Title
Vertical Axis Title
Vertical Axis Numbers
Horizontal Axis Title
Horizontal Axis Numbers
Footer
Legend
Figaro Options
Figaro
Figaro Library - the Figaro library file path.
Tree generation options - the Figaro tree generation options file path.
Figaro Processor - the Figaro processor location.
CRML Options
CRML
Compiler Jar - the compiler jar file of CRML.
Compiler Arguments - arugments to the compiler process.
Processor - the CRML translator.
Modelica Library Paths - list of Modelica library paths that are needed to run the translated model.
Debugger Options
Algorithmic Debugger
GDB Path - the gnu debugger path
GDB Command Timeout - timeout for gdb commands.
GDB Output Limit - limits the GDB output to N characters.
Display C frames - if true then shows the C stack frames.
Display unknown frames - if true then shows the unknown stack frames. Unknown stack frames means frames whose file path is unknown.
Clear old output on a new run - if true then clears the output window on new run.
Clear old log on new run - if true then clears the log window on new run.
Transformational Debugger
Always show Transformational Debugger after compilation - if true then always open the Transformational Debugger window after model compilation.
Generate operations in the info xml - if true then adds the operations information in the info xml file.
FMI Options
Export
Version
1.0 - Sets the FMI export version to 1.0
2.0 - Sets the FMI export version to 2.0
Type
Model Exchange - Sets the FMI export type to Model Exchange.
Co-Simulation - Sets the FMI export type to Co-Simulation.
Model Exchange and Co-Simulation - Sets the FMI export type to Model Exchange and Co-Simulation.
FMU Name - Sets a prefix for generated FMU file.
Move FMU - Moves the generated FMU to a specified path.
Platforms: See Platforms.
Solver for Co-Simulation
Explicit Euler
CVODE
Model Description Filters - Sets the variable filter for model description file, see --fmifilter.
Include Modelica based resources via loadResource
Include Source Code - Sets if the exported FMU can contain source code. Model Description Filter "blackBox" will override this, because black box FMUs do never contain their source code.
Generate Debug Symbols - Generates a FMU with debug symbols.
Import
Delete FMU directory and generated model when OMEdit is closed - If true then the temporary FMU directory that is created for importing the FMU will be deleted.
OMSimulator/SSP Options
General
Command Line Options - sets the OMSimulator command line options.
Logging Level - OMSimulator logging level.
Sensitivity Optimization Options
General
OMSens Backend Path - sets the OMSens backend.
python - sets the Python executable to run OMSens scripts.
__OpenModelica_commandLineOptions Annotation
OpenModelica specific annotation to define the command line options needed to simulate the model. For example if you always want to simulate the model with a specific matching algorithm and index reduction method instead of the default ones then you can write the following code,
model Test
  annotation(__OpenModelica_commandLineOptions = "--matchingAlgorithm=BFSB --indexReductionMethod=dynamicStateSelection");
end Test;
The annotation is a space separated list of options where each option is either just a command line flag or a flag with a value.
In OMEdit open the Simulation Setup and set the Translation Flags then in the bottom check Save translation flags inside model i.e., __OpenModelica_commandLineOptions annotation and click on OK.
If you want to ignore this annotation then use setCommandLineOptions("--ignoreCommandLineOptionsAnnotation=true"). In OMEdit Tools > Options > Simulation check Ignore __OpenModelica_commandLineOptions annotation.
__OpenModelica_simulationFlags Annotation
OpenModelica specific annotation to define the simulation options needed to simulate the model. For example if you always want to simulate the model with a specific solver instead of the default DASSL and would also like to see the cpu time then you can write the following code,
model Test
  annotation(__OpenModelica_simulationFlags(s = "ida", cpu = "()"));
end Test;
The annotation is a comma separated list of options where each option is a simulation flag with a value. For flags that doesn't have any value use () (See the above code example).
In OMEdit open the Simulation Setup and set the Simulation Flags then in the bottom check Save simulation flags inside model i.e., __OpenModelica_simulationFlags annotation and click on OK.
If you want to ignore this annotation then use setCommandLineOptions("--ignoreSimulationFlagsAnnotation=true"). In OMEdit Tools > Options > Simulation check Ignore __OpenModelica_simulationFlags annotation.
Global and Local Flags
There is a large number of optional settings and flags to influence the way OpenModelica generates the simulation code (Compiler flags, a.k.a. Translation flags or Command Line Options) and the way the simulation executable is run (Simulation Flags).
The global default settings can be accessed and changed with the Tools > Options menu.
It is also possible to reset them to factory state by clicking on the Reset button of the
Tools > Options dialog window.
When you start OMEdit and you simulate a model for the first time, the model-specific simulation
session settings are initialized by copying the global default settings, and then by applying any
further settings that are saved in the model within OpenModelica-specific __OpenModelica_commandLineOptions
and __OpenModelica_simulationFlags annotations. Note that the latter may partially override the former,
if they give different values to the same flags.
You can change those model-specific settings at will with the Simulation Setup window.
Any change you make will be remembered until the end of the simulation session, i.e. until you close OMEdit.
This is very useful to experiment with different settings and find the optimal ones,
or to investigate bugs by turning on logging options, etc. If you check the Save translation flags
and Save simulation flags options in the simulation setup, those settings will be saved in the
model within the corresponding OpenModelica-specific annotations, so that you can get the same behavior
when you start a new session later on, or if someone else loads the model on a different computer.
Otherwise, all of those changes will be forgotten when you exit OMEdit.
If you change the global default settings after running some models, the simulation settings of those models will be reset as if you closed OMEdit and restarted a new session: the new global options will first be applied, and then any further setting saved in the OpenModelica-specific annotations will be applied, possibly overriding the global options if the same flags get different values from the annotations. Any model-specific settings that you may have changed with Simulation Setup up to that point will be lost, unless you saved them in the OpenModelica-specific annotations before changing the global default settings.
Debugger
For debugging capability, see Debugging.
Editing Modelica Standard Library
By default OMEdit loads the Modelica Standard Library (MSL) as a system library. System libraries are read-only. If you want to edit MSL you need to load it as user library instead of system library. We don't recommend editing MSL but if you really need to and understand the consequences then follow these steps,
Go to Tools > Options > Libraries.
Remove Modelica & ModelicaReference from list of system libraries.
Uncheck force loading of Modelica Standard Library.
Add $OPENMODELICAHOME/lib/omlibrary/Modelica X.X/package.mo under user libraries.
Restart OMEdit.
Install Library
A new library can be installed with the help of the package manager. Click File->Manage Libraries->Install Library to open the install library dialog. OMEdit lists the libraries that are available for installation through the package manager.
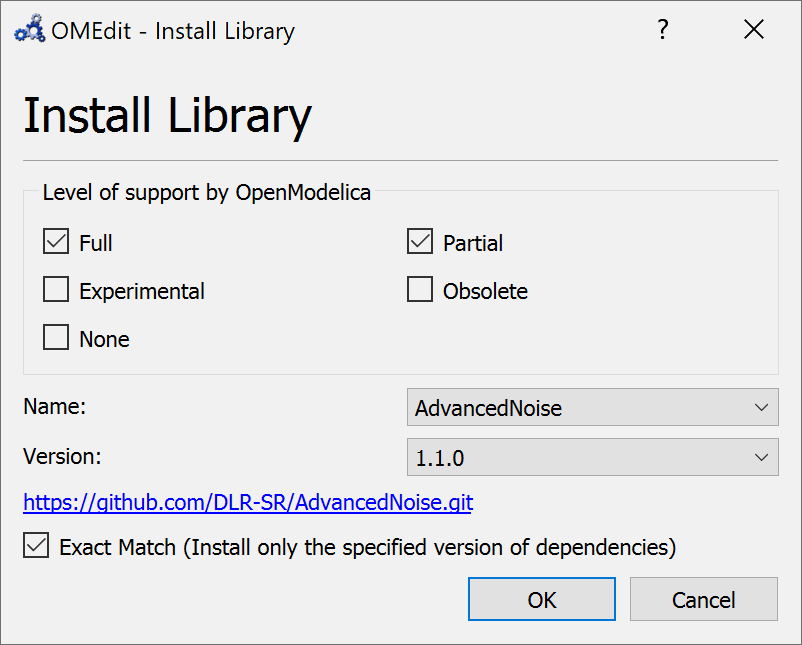
Figure 17 Install Library.
Convert Libraries using Conversion Scripts
In order to convert the libraries right-click the model/package in the Libraries Browser and choose Convert to newer versions of used libraries. OMEdit will read the used libraries from the uses-annotation and list any new version of the library that provide the conversion using the conversion script.
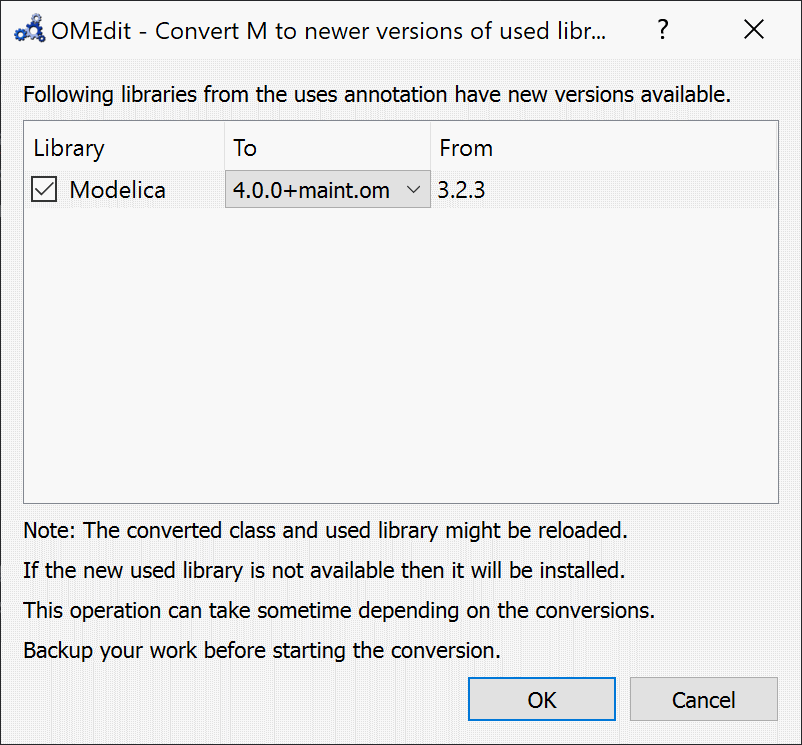
Figure 18 Converts the model/package to newer version of used libraries.
State Machines
Creating a New Modelica State Class
Follow the same steps as defined in Creating a New Modelica Class. Additionally make sure you check the State checkbox.
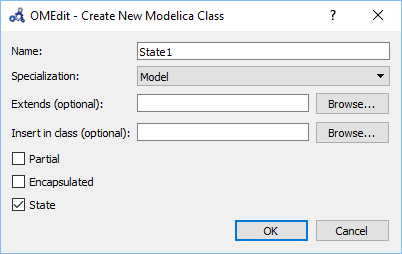
Figure 19 Creating a new Modelica state.
Making Transitions
In order to make a transition from one state to another the user first needs
to enable the transition mode () from the toolbar.
Move the mouse over the state. The mouse cursor will change from arrow cursor to cross cursor. To start the transition press left button and move while keeping the button pressed. Now release the left button. Move towards the end state and click when cursor changes to cross cursor.
A Create Transition dialog box will appear which allows you to set the transition attributes. Cancelling the dialog will cancel the transition.
Double click the transition or right click and choose Edit Transition to modify the transition attributes.
State Machines Simulation
Support for Modelica state machines was added in the Modelica Language Specification v3.3. A subtle problem can occur if Modelica v3.2 libraries are loaded, e.g., the Modelica Standard Library v3.2.2, because in this case OMC automatically switches into Modelica v3.2 compatibility mode. Trying to simulate a state machine in Modelica v3.2 compatibility mode results in an error. It is possible to use the OMC flag --std=latest in order to ensure (at least) Modelica v3.3 support. In OMEdit this can be achieved by setting that flag in the Tools > Options > Simulation dialog.
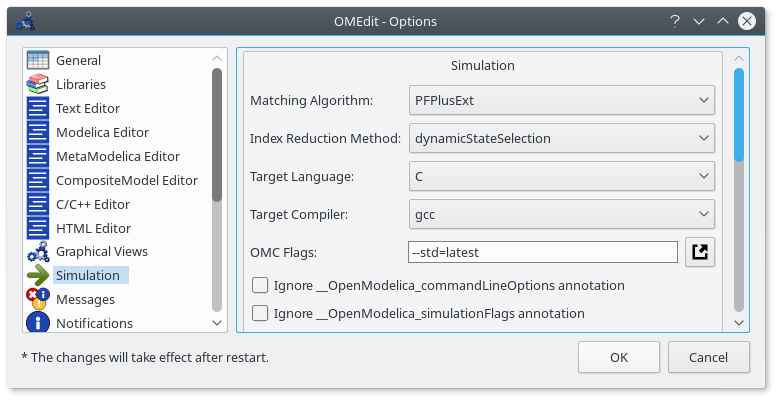
Figure 20 Ensure (at least) Modelica v3.3 support.
State Machines Debugger
Modelica state machines debugger is implemented as a visualization, which allows the user to run the state machines simulation as an animation.
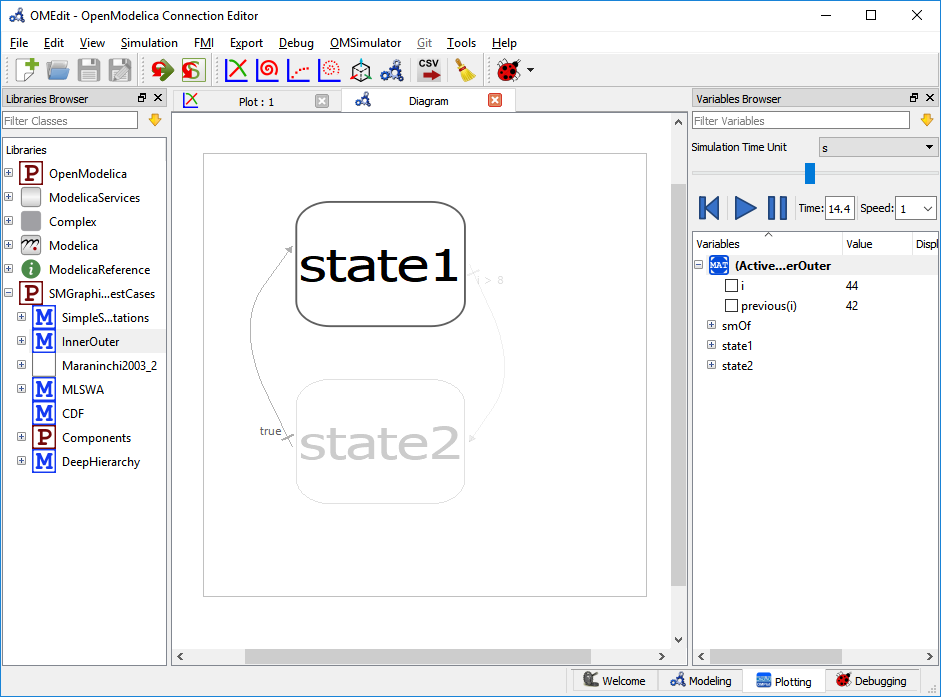
Figure 21 State machine debugger in OMEdit.
A special Diagram Window is developed to visualize the active and inactive states. The active and inactive value of the states are stored in the OpenModelica simulation result file. After the successful simulation, of the state machine model, OMEdit reads the start, stop time values, and initializes the visualization controls accordingly.
The controls allows the easy manipulation of the visualization,
Rewind - resets the visualization to start.
Play - starts the visualization.
Pause - pauses the visualization.
Time - allows the user to jump at any specific time.
Speed - speed of the visualization.
Slider - controls the time.
The visualization is based on the simulation result file. All three formats of the simulation result file are supported i.e., mat, csv and plt where mat is a matlab file format, csv is a comma separated file and plt is an ordered text file.
Using OMEdit as Text Editor
OMEdit can be be used as a Text editor. Currently support for editing MetaModelica,Modelica and C/C++ are available with syntax highlighting and autocompletion of keywords and types. Additionaly the Modelica and MetaModelica files are provided with autocompletion of code-snippets along with keywords and types. The users can load the directory from file menu File > Open Directory. which opens the Directory structure in the Libraries-browser.
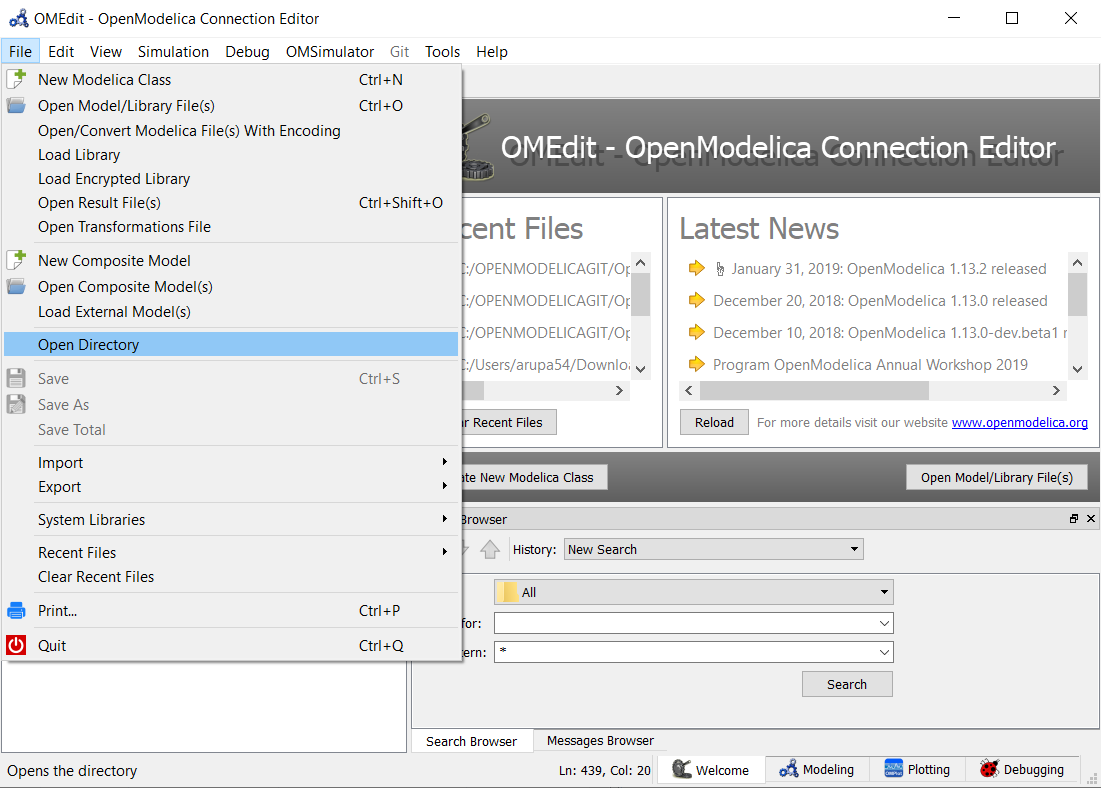
Figure 22 open-directory
After the directory is opened in the Libraries-browser, the users can expand the directory structure and click the file which opens in the texteditor.
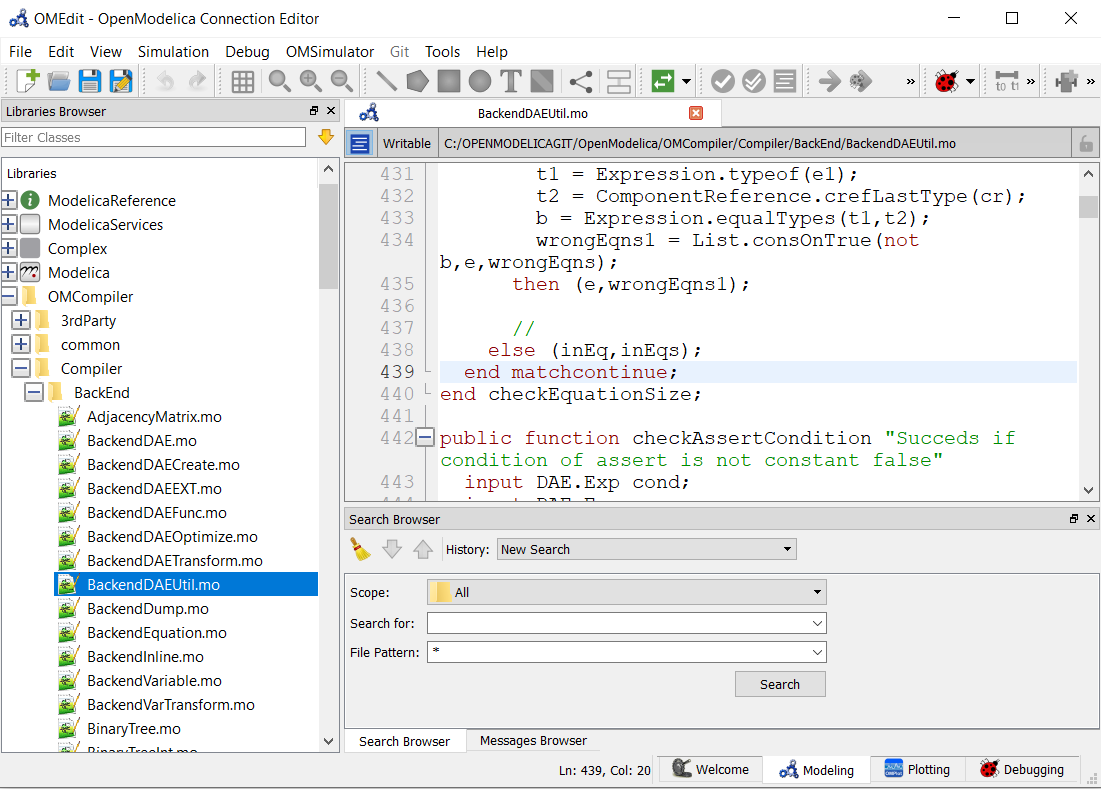
Figure 23 openfile in texteditor
Advanced Search
Support to search in OMEdit texteditor is available. The search browser can be enabled by selecting View > Windows > Search browser or through shortcut keys (ctrl+h).
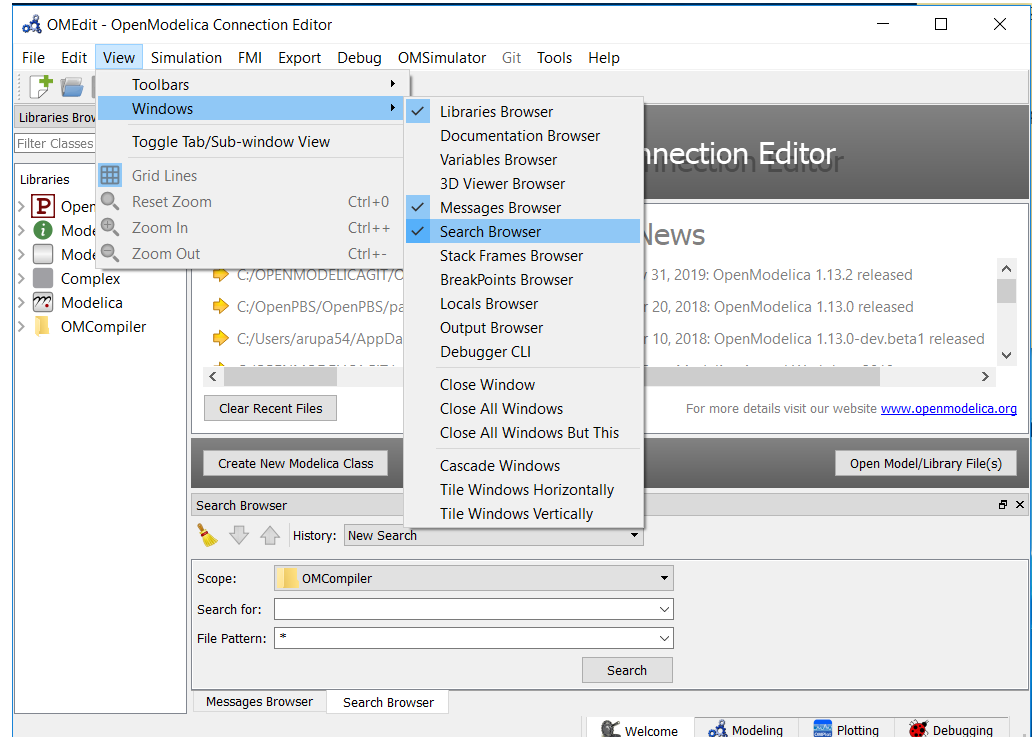
Figure 24 Enable omedit search browser
The users can start the search by loading the directory they want to search and fill in the text to be searched for and file pattern if needed and click the search button.
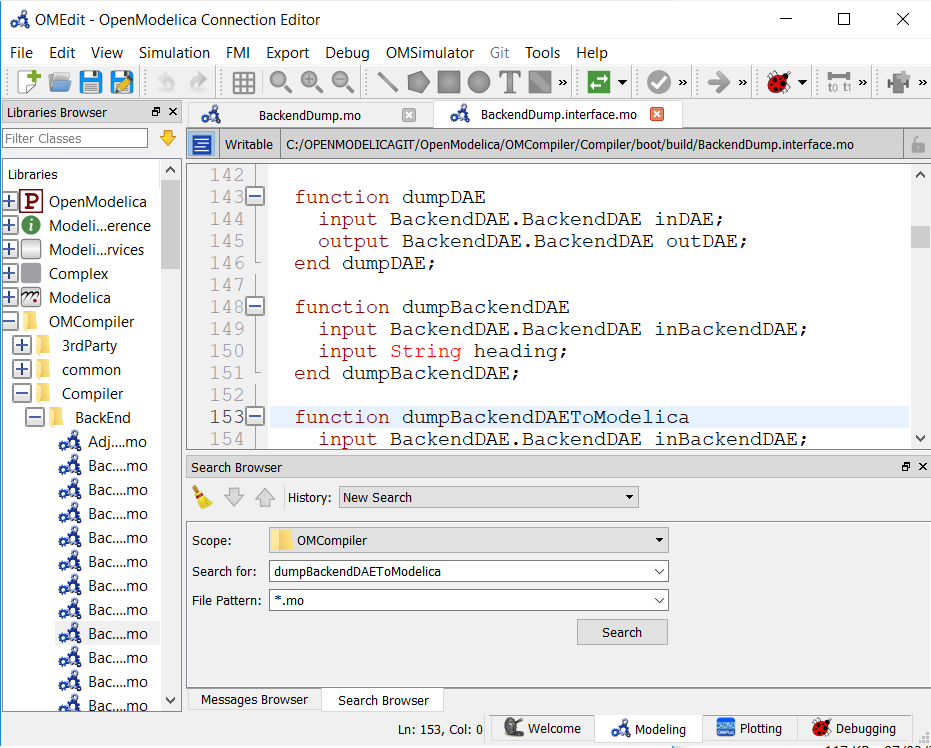
Figure 25 Start search in search browser
After the search is completed the results are presented to the users in a separate window, The search results contains the following
The name of the files where the searched word is matched
The line number and text of the matched word.
The users can click the line number or the matched text and it will automatically open the file in the texteditor and move the cursor to matched line number of the text.
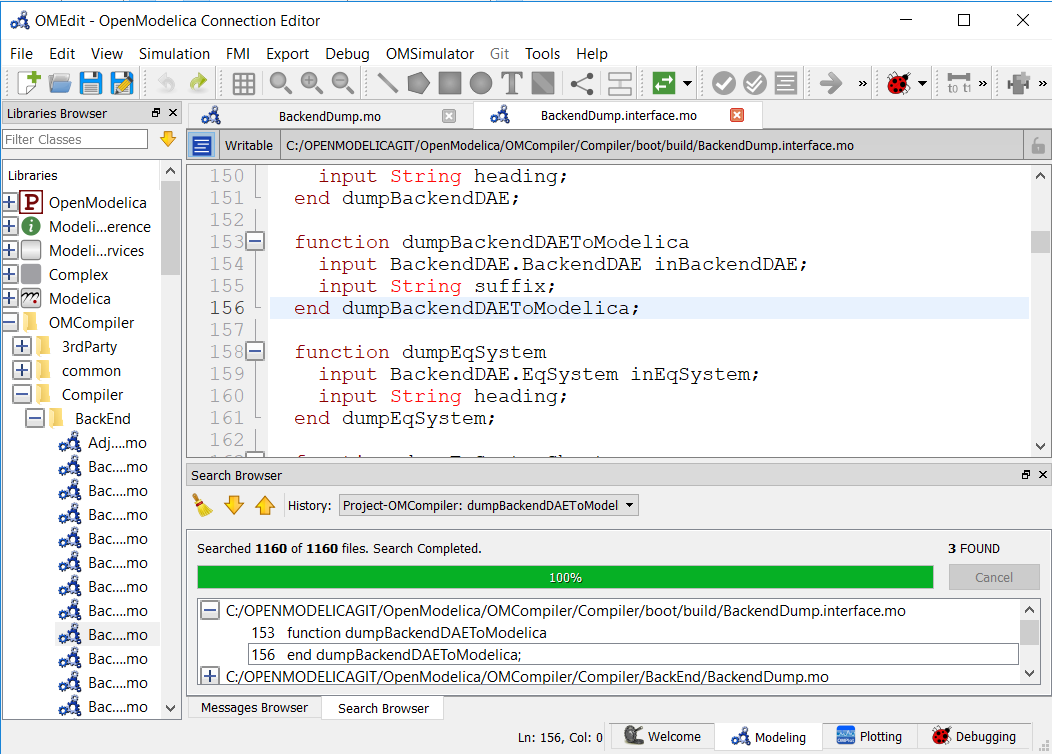
Figure 26 Search Results
The users can perform multiple searches and go back to old search results using search histroy option.
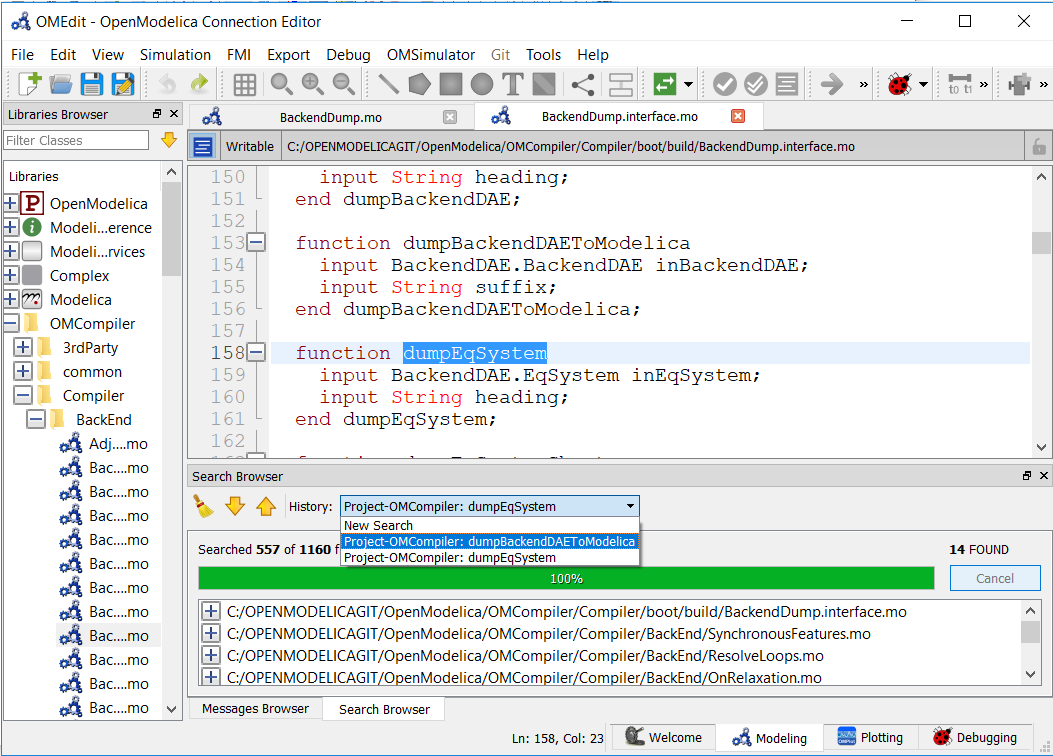
Figure 27 Search History
Temporary Directory, Log Files and Working Directory
On Unix/Linux systems temporary directory is the path in the TMPDIR environment variable or /tmp if TMPDIR is not defined appended with directory paths OpenModelica<USERNAME>/OMEdit so the complete path is usually /tmp/OpenModelica<USERNAME>/OMEdit.
On Windows its the path in the TEMP or TMP environment variable appended with directory paths OpenModelica/OMEdit so the complete path is usually %TEMP%/OpenModelica/OMEdit.
All the log files are always generated in the temporary directory. Choose Tools > Open Temporary Directory to open the temporary directory.
By default the working directory has the same path as the temporary directory. You can change the working directory from Tools > Options > General see section General Options.
For each simulation a new directory with the model name is created in the working directory and then all the simulation intermediate and results files are generated in it.
High DPI Settings
When the text is too big / too small to read there are options to change the font size used in OMEdit, see Text Editor Options.
If you are using a high-resolution screen (1080p, 4k and more) and the app is blurry or the overall proportions of the different windows are off, it can help to change the DPI settings.
On Windows it is possible to change the scaling factor to adjust the size of text, apps and other times, but the default setting might not be appropriate for OMEdit e.g., on compact notebooks with high resolution screens.
You can either change the scaling factor for the whole Windows system or only change the scaling used for OMEdit. This is done by changing the Compatibility settings for High DPI settings for OMEdit.exe with the following steps:
Press Windows-Key and type OpenModelica Connection Editor and right-click on the app and Open file location, Figure 28.
Right-click on OpenModelica Connection Editor and open Properties.
In the properties window go to tab Compatibility and open Change high DPI settings. In the High DPI settings for OMEdit.exe choose Use the settings to fix scaling problems for this program instead of the one in Settings and Override high DPI scaling behavior.Scaling performed by: and choose System from the drop-down menu, Figure 29.
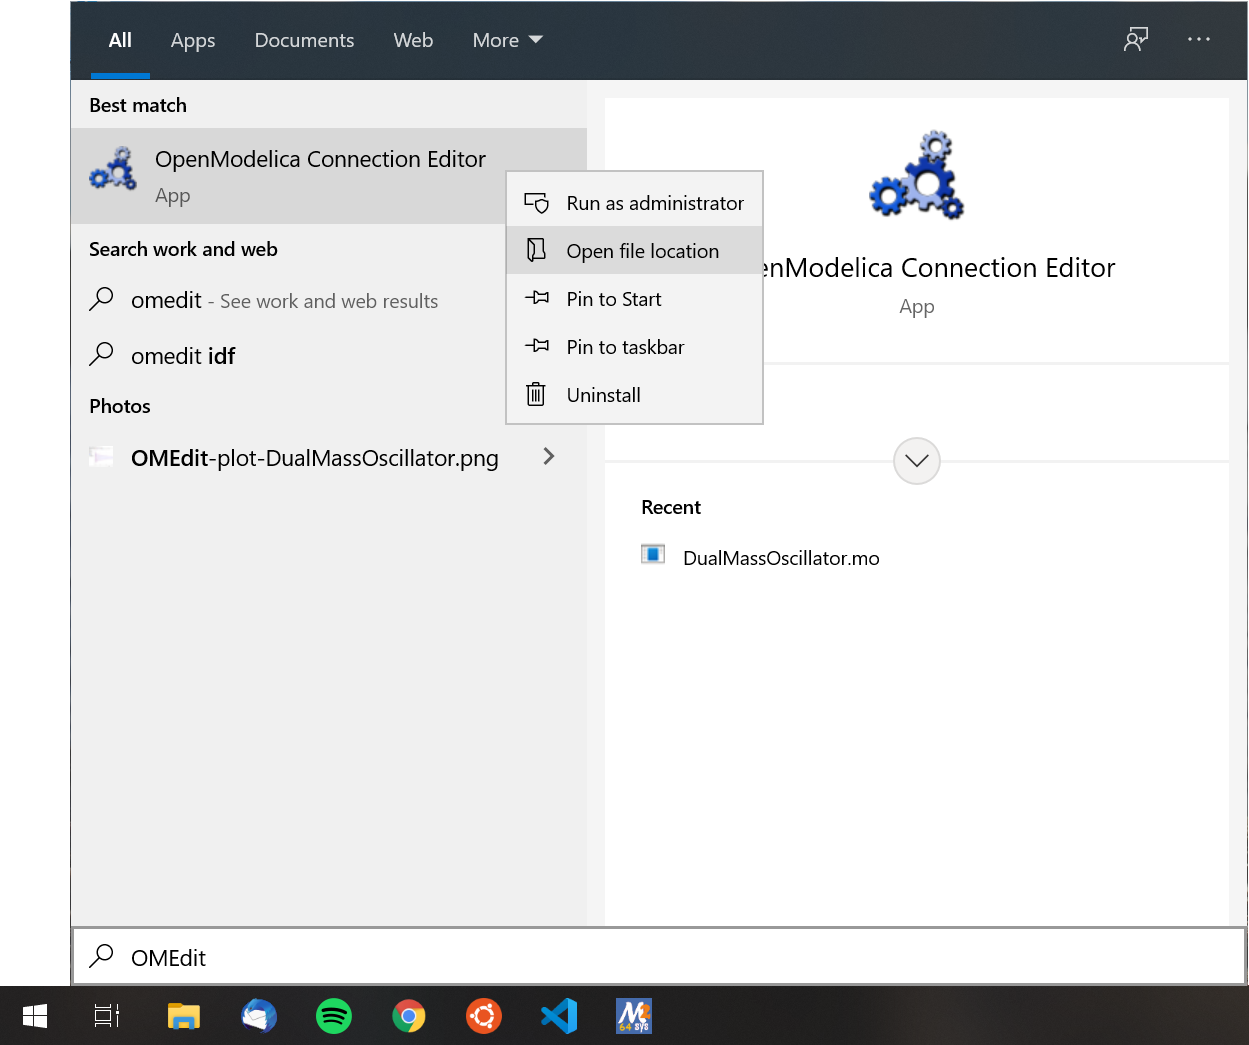
Figure 28 Open file location of OpenModelica Connection Editor
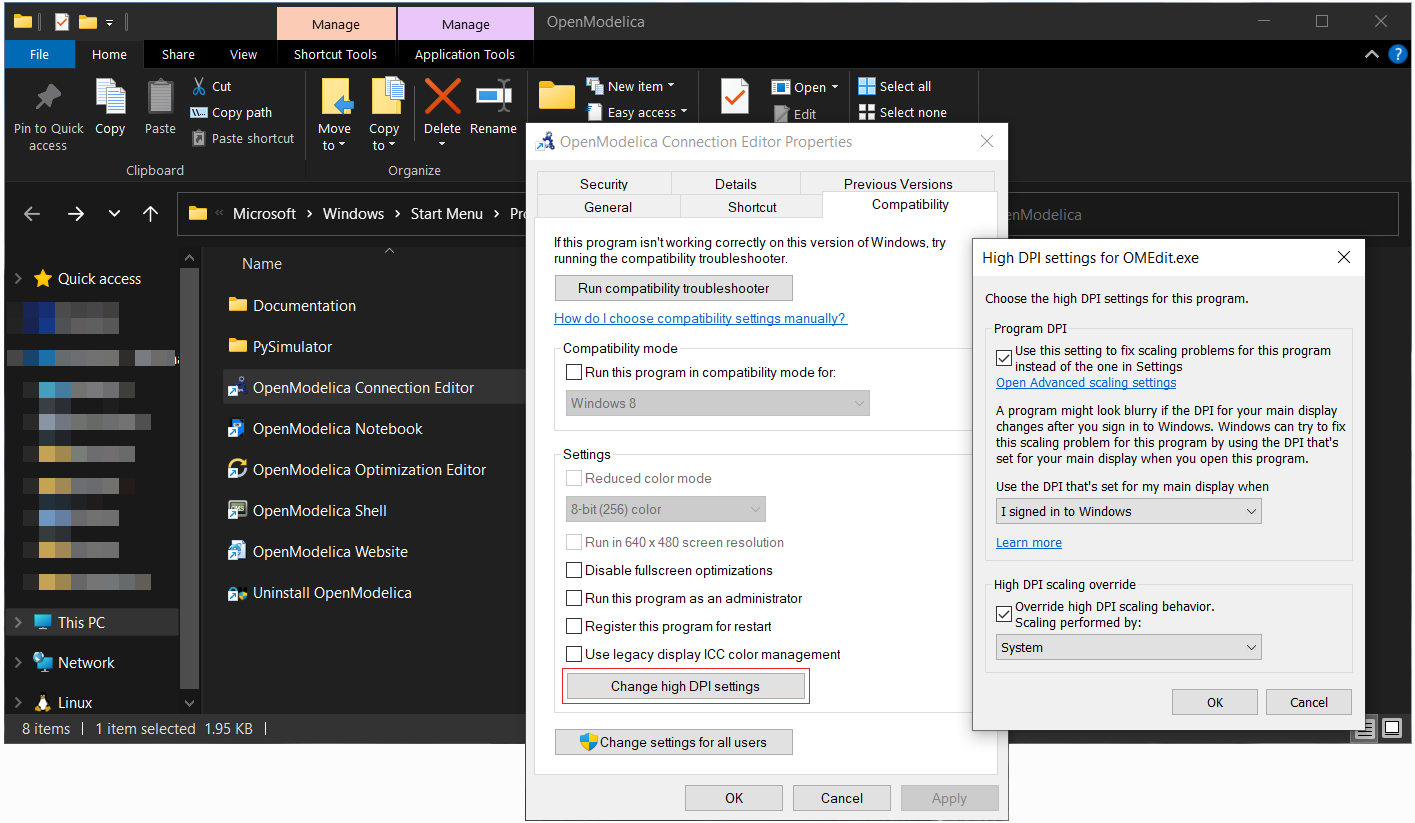
Figure 29 Change high DPI settings for OMEdit.exe
